Log
View Options
UTF32 to UTF16 Surrogate Pairs
10/11/22
Recently I had to make an Icon component that could accept UTF32 characters to display in SVG glyphs. It seemed pretty simple at first. I already had an array of unicode symbols I would plug in and my component would represent them in an ADA friendly way.
Then I noticed the list contained several character codes that were out of the UTF16 scope and just as I feared these got garbled when trying to run them through JavaScript. JavaScript being built long before emojis and the need of UTF32 only supports UTF16 in strings to this day (sort of).
Eventually when UTF32 started becoming more popular the Unicode maintainers came up with a solution. There where several plains or ranges of higher character codes that weren't currently in use. While these could in no way to support a one to one mapping to accommodate UTF32 they decided they would make supplementary character sets using two 16 byte sets. After some searching I finally found a table of surrogate characters.
Now, I figured surely, there is a built in solution in the modern era for supporting UTF32 in JavaScript and there is. The native String object has a method called fromCodePoint which is supported by all major modern browsers.
Sure enough, I was able to plug my UTF32 characters and return the two UTF16 characters that would make my glyphs. Cool, but, it left me curious. The only way to use UTF32 characters in JavaScript before was to use fromCharCode. So, how did the math work to know how to split the UTF32 values when using fromCharCode?
After much digging I found an example of the alogrithm on the Unicdoe Consortium website. The only issue was it was not very well documented as to why certain operations were being performed. I needed to know more.
After much searching, trial, and error I came across a Wikipedia article that helped me understand just why all of this math was necessary and how it worked to reorder the bytes. I ended up developing a well commented example function for converting UTF32 to UTF16 friendly characters. While this function seems to work well I would recommend the Mozilla polyfill if you're to need something like this for production.
[JavaScript]
		/*	@summary: Take a unicode character code. If it is 16bit range do nothing. If it's in 32 bit range convert to a UTF32 JavaScript friendly character set.
		*	@prop c: A character or a number to covert to a JavaScript friendly character.
		*/
		function asUTF16(c)
		{
			// Minimum value for the high end character code (fist 10 digits)
			const surh_base = 0xd800;
			// Minimum value for the low end charater code (last 10 digits)
			const surl_base = 0xdc00;
			// Row size for surrogate characters
			const sur_int = 0x400;
			// The leading bit to remove before math operations
			const xbit = 0x10000;
			// The stripped down value for calcualting surrogate
			let c_base = (c - xbit);
			//	First value determined by left 10 bits plus surrogate high base
			let c1 = Math.floor(c_base / sur_int) + surh_base;
			// If c1 is not a 32bit range return the original 16bit set
			if(c1 < surh_base)
				return String.fromCharCode(c);
			// Second value determned by right 10 bits plus surrogate low base
			let c2 = (c_base % sur_int) + surl_base;
			// Return our 32bit character set
			return String.fromCharCode(c1, c2);
		}
Try it out
Mayhem in Miami
8/23/22
My friend and former neighbor Angelique was about to have a bachelorett party and asked me if I could design a logo for it. It had been some time since I've done a logo design so I was happy to give it a go. I dusted off my old light board and got to sketching out some ideas. After five roughs I finally got one she liked however, after rendering into SVG she had a few... a lot of change requests.
She's a bit of an art person herself so I invited her over to finish the design. The above image is my original design and below is the final. I think we made a great end result. If you'd like to see the design is it's full SVG glory, click here!
NeoBlue Wall Server
6/30/22
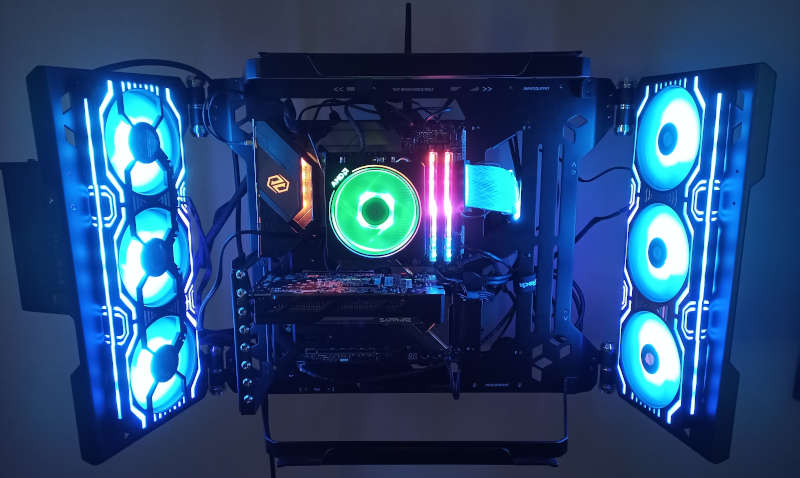
For many years now I've been using the first computer I had ever built (Old Blue) as a home server supporting HTTP, FTP, SSH, RDP, SMD, PHP and a few other protocols running on Centos 8. Though it was nearly 20 years old it did the job fine. After building my self a new desktop I came across the Cooler Master Masterframe 700.
The case was very unique looking and best of all you could wall mount it. After having Old Blue under my desk for a number of years the idea of wall mounted server was very appealing. So, I gathered the following components and began building my new server, NeoBlue.
NeoBlue Components
- Cooler Master MasterFrame 700
- AMD Ryzen 7 3rd Gen - RYZEN 7 3800X CPU
- G.SKILL Trident Z Royal Series 16GB (x2) RAM
- ASRock B550 TAICHI AM4 AMD B550 Motherboard
- SAMSUNG 980 M.2 2280 1TB
- Seagate IronWolf Pro 8TB NAS Hard Drive 7200 RPM
- EVGA 750 B5 Gold PSU
- Sapphire Radeon R7 370 GPU
- Soft Hard RGB PSU Cable Extension
- VIVO Full Motion Wall Mount
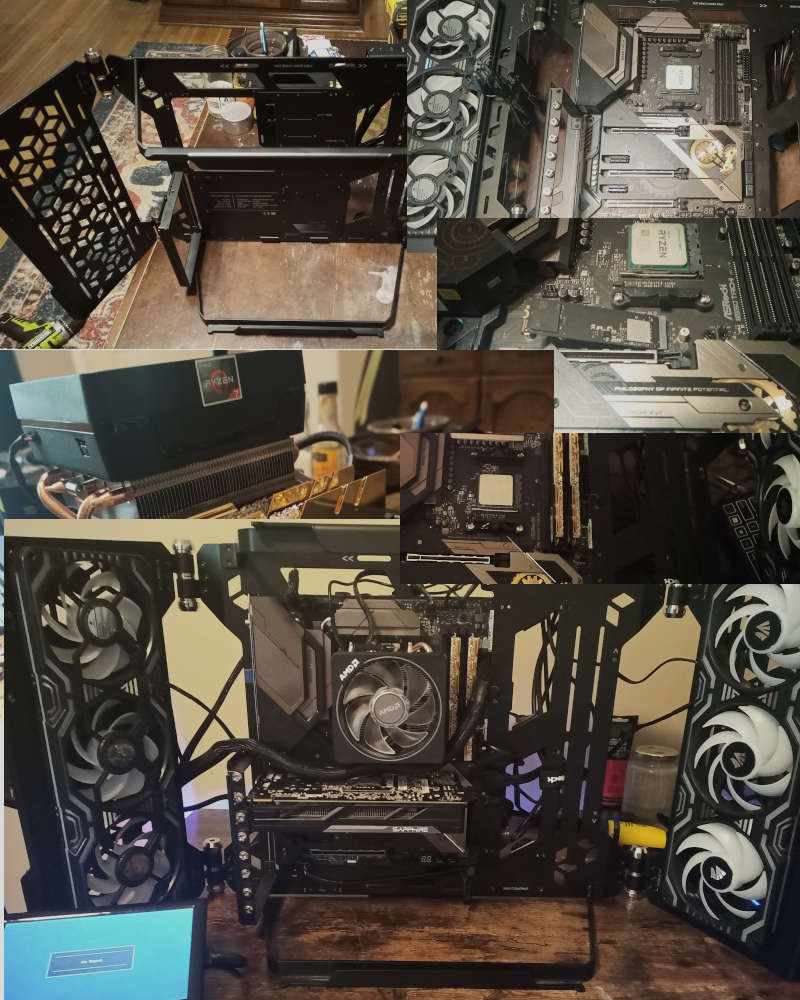
The MasterFrame is a pretty heavy case made of thick steel but offers plenty of room to route your cables. The wall mounting was a bit tricky. My initial arm had a swivel head and when wall mounting you have to place the PSU on the left wing resulting in a full tilt to the side. Another hurdle was my first motherboard being dead on arrival causing me to have to take apart the whole computer and wait on a new one. ASRock was actually very easy to deal with and I was able to get a new board in a week. I ended up getting the PSU cable extension to make the cable long enough to run through the back also, the extnsion has cool led lights which makes it 10% faster. For NeoBlue I decided to give Ubuntu Server 22 LTS a try.
If you're wondering what happened to Old Blue well, I took out the motherboard and and replaced it with a ASRock Z97 I had laying around, put in an i7, and 16GB of RAM. I then gifted it to my nephew however, FedEx did not treat the package as delicate and broke the case and several components. Luckily, a month later my dad came to visit and brought the busted computer back and I was able to replace the drives and get it working again, all be it with a now broken case. I'm still in the process of getting my insurance claim back from FedEx (sigh...). But hey, isn't this a cool looking computer?!
Xero Style
6/2/22
Long time friend and kick-ass software engineer Xero has started a new YouTube channel where he discusses cyberpunk pocket trash style. He has always had a taste for aesthetics and is now spreading his virus via his YouTube channel, Xero Style.
While most of the video are about DIY fashion there are some covering hacking and hardware manipulation. I'm looking forward to see this channel grow and the neat content that will come from it.
Bart's Mart Art
7/7/21
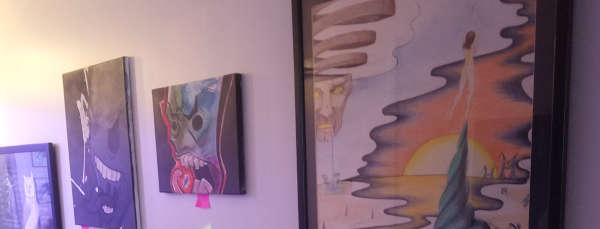
It had been some time since I was in any kind of art show but, along with new friend and skilled artist Francesko we held an art show at the local bottle shop, Bart's Mart.
The event was sponsored by Wicked Weed no less and they were serving up free drinks along with a bunch of free merch.
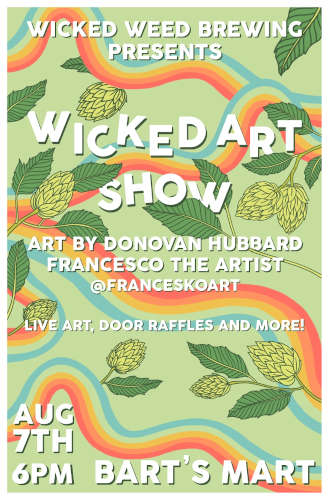
Table Top Map Maker
8/25/20
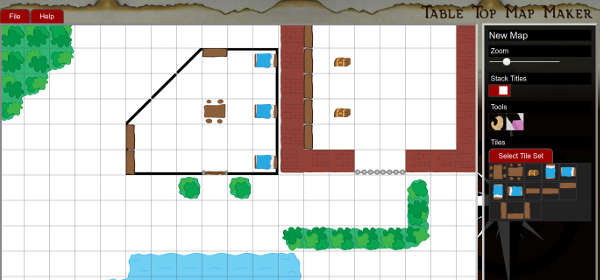
A while back I started keeping a web page to track of my D&D games. It made running games a lot easier to have all of my information in one place. The only real downside was making maps. For a while I would just carry my custom maps in a folder. Then, wanting to have all of my info in one place, I started taking pictures of the maps and uploading them to my server. While it worked, it was not an optimal solution.
After a while I though it would be more convenient to have an application to make maps, save them for editing, and export JPG files. Well, I started out on this a little over a month ago (working in my spare time) and have come up with the beginning of something that has a lot of potential.
Currently, the interface is simple enough. On the right side is a select menu with different tile sets you can pick from. Click on your tile set and then click where you want to set it. There are some simple features like zoom (in and out), a toggle for stacking tiles, a grabber and an eraser.
There is basic file management functionality that lets you create a new map, save a map for editing, load a saved map, and export a map to a JPG. The save files use a JSON format to store the SVG data and repopulate it on load.
One feature that I'm excited about is how the master SVG tiles get loaded into the application. In the ./tiles directory there is a file name tile_sets.json that allows anyone to include more tiles, thus allowing creates to make and share their own tile sets!
When making a tile set you can start with the mm_tiles_templates.svg (or .ai) make a copy and name it. Then you'll see several layers (<g> objects) each with an id that signifies where the tiles relative placement is. There is also a guides layer that will not render into a tile in the application. This is just to help tile authors line up their edges.
The application is in a usable state currently and you can make, save, and export maps. The next steps are making the design look better; I sort of slopped it together as I developed. Then I'm going to work on making it mobile friendly. After all of that, I plan of nailing down the Help instruction and committing it to my new Cyber Monkey GIT share so people get build new tiles and features.
Anyways, if you are interested making some maps or just want to play with the app, check it out here!
Dynamic SVG Filters
6/3/20
When redesigning my (this) site recently I wanted to do some fun things with dynamic display using SVG elements. If you have noticed the background is always different shapes and colors. This is because it is made up of randomly generated SVG elements. You may also notice that there is a shine to some of the edges. This is because of dynamically generated SVG filters applied to the shapes.
Here I'm going to share the techniques on making your own dynamic SVG filters. You will need some understanding of SVG filters to follow along. For this exercise we're going to create a light filter like the example below.
Light Filter Controls
Step 1: Element Setup
Let's set up our elements. First we'll add a placeholder element where we'll add our SVG content later.
[HTML]
				<div id="svg_wrap">
				 	<!--	Dynamic content	-->
				</div>
It's important to note SVG uses
DOM2
which means referencing them in JavaScript isn't exactly the same as referencing a HTMLElement.
To create an SVG element we'll want to specify the namespace where our element is defined. For all SVG elements you can use http://www.w3.org/2000/svg. To apply the namespace when creating elements we'll use createElementNS. Let's start and build all of the basic SVG elements.
- <svg> The main SVG element that will hold all other elements.
- <defs> Here we define filters that we can attach to our graphic elements. Child of svg.
- <filter> The filter combines all of the style layers that we will want to apply. Child of defs.
- <feSpecularLighting> A basic lighting layer that controls color and intensity. Child of filter.
- <fePointLight> A modifier for feSpecularLighting that controls size and placement. Child of feSpecularLighting.
- <feComposite> This allows us to add a filter to a graphic object. Child of filter.
- <circle> This is our graphic element. Child of svg.
Let's see what this looks like in script.
[JavaScript]
				var svg = document.createElementNS("http://www.w3.org/2000/svg", "svg");
				var defs = document.createElementNS("http://www.w3.org/2000/svg", "defs");
				var filter = document.createElementNS("http://www.w3.org/2000/svg", "filter");
				var fe_spec_light = document.createElementNS("http://www.w3.org/2000/svg", "feSpecularLighting");
				var fe_point_light = document.createElementNS("http://www.w3.org/2000/svg", "fePointLight");
				var fe_comp = document.createElementNS("http://www.w3.org/2000/svg", "feComposite");
				var circle = document.createElementNS("http://www.w3.org/2000/svg", "circle");
Cool, now we have all of the elements we'll be using to build our example.
Step 2: Attribute Setup
Next we'll set the attributes to our elements. Unlike the SVG elements, a namespace isn't required when manipulating element attributes. So, when calling setAttributeNS the first parameter will be null.
I have added comments to the code sample below to explain some of the more esoteric attributes.
[JavaScript]
				// Set attributes for the svg element
				svg.setAttributeNS(null, "viewBox", "0 0 100 100"); // The display area of our SVG canvas
				svg.setAttributeNS(null, "width", "100");	// The width of our SVG canvas
				svg.setAttributeNS(null, "height", "100"); // The height of our SVG canvas
				// Set attributes for the filter element
				filter.setAttributeNS(null, "id", "circle_fitler"); // For refercning when applying the filter to our circle element
				// Set attributes for the feSpecularLighting element
				fe_spec_light.setAttributeNS(null, "result", "spec_light"); // For refercning in feComposite in2 attribute
				fe_spec_light.setAttributeNS(null, "specularConstant", "2"); // The hardness of the light
				fe_spec_light.setAttributeNS(null, "specularExponent", "50"); // The spread of the light
				fe_spec_light.setAttributeNS(null, "lighting-color", "#fff"); // The color of the light
				// Set attributes for the fePointLight element
				fe_point_light.setAttributeNS(null, "x", "50"); // The X position of the light
				fe_point_light.setAttributeNS(null, "y", "20"); // The y position of the light
				fe_point_light.setAttributeNS(null, "z", "50"); // The z or distance of the light
				// Set attributes for the feComposite element
				fe_comp.setAttributeNS(null, "in", "SourceGraphic"); // The element to apply the filter to. SourceGraphic means the origin element
				fe_comp.setAttributeNS(null, "in2", "spec_light"); // The id of the filter to apply
				fe_comp.setAttributeNS(null, "operator", "arithmetic"); // This allows us to combine the outcomes of our two in targets
				fe_comp.setAttributeNS(null, "k1", "1"); // Light source inside of SourceGraphic
				fe_comp.setAttributeNS(null, "k2", "1"); // SourceGraphic opacity
				fe_comp.setAttributeNS(null, "k3", "0"); // Setting this to 0 prevents the transparent background from getting light
				fe_comp.setAttributeNS(null, "k4", "0"); // Setting this to 0 prevents the transparent foreground from getting light
				// Set attributes for the circle element
				circle.setAttributeNS(null, "cx", "50"); // Start X position
				circle.setAttributeNS(null, "cy", "50"); // Start Y position
				circle.setAttributeNS(null, "fill", "rgb(153, 153, 255)"); // Circle fil color
				circle.setAttributeNS(null, "r", "50"); // Circle radius
				circle.setAttributeNS(null, "style", "filter: url(#circle_fitler);"); // Point to our filter id to apply it
Step 3: Construct the Elements
Now we just need to put the elements together in the right order. Use the elements list above if you get confused on what element should be a child of another element.
[JavaScript]
				fe_spec_light.appendChild(fe_point_light);
				filter.appendChild(fe_spec_light);
				filter.appendChild(fe_comp);
				defs.appendChild(filter);
				svg.appendChild(defs);
				svg.appendChild(circle);
				// Target the element where we add all of the elemtns
				let svg_wrap = document.getElementById("svg_wrap"); // Use the id of the element you want to add everything to
				svg_wrap.appendChild(svg);
Now you should be able to run your code and see your circle with the pin light filter applied to and since we have JavaScript references to all of the elements we just built we can easily change their attributes.
Step 4: Applying Controls
Now, there are a whole bunch of ways we could manipulate our light. We could use a setTimeout to gradually move it. We could make it blink. We could make it pulse. For the purposes of this experiment we're going to use range sliders to adjust our light.
Here is the markup for the range sliders.
[HTML]
				<div>
				 	<input id="pinx" name="pinx" type="range" min="0" max="100" step="1" value="50"/>
				 	<label for="pinx">X</label>
				 	<br/>
				 	<input id="piny" name="piny" type="range" min="0" max="100" step="1" value="20"/>
				 	<label for="piny">Y</label>
				 	<br/>
				 	<input id="pinz" name="pinz" type="range" min="0" max="100" step="1" value="50"/>
				 	<label for="pinz">Radius</label>
				</div>
Note the id attribute of the inputs. We'll be using these.
[JavaScript]
				// Get referces to control inputs
				ctrl_pinx = document.getElementById("pinx");
				ctrl_piny = document.getElementById("piny");
				ctrl_pinz = document.getElementById("pinz");
				// Create contorl function
				function updateFitlers(e)
				{
				 		let fx = ctrl_pinx.value;
				 		let fy = ctrl_piny.value;
				 		let fz = ctrl_pinz.value;
				 		fe_point_light.setAttributeNS(null, "x", fx + "");
				 		fe_point_light.setAttributeNS(null, "y", fy + "");
				 		fe_point_light.setAttributeNS(null, "z", fz + "");
				};
				// Assign functionality
				ctrl_pinx.addEventListener("input", updateFitlers);
				ctrl_piny.addEventListener("input", updateFitlers);
				ctrl_pinz.addEventListener("input", updateFitlers);
Conclusion
Congratulations, if you've been following along you should have your own dynamic SVG filter working. If not you can download the example package and have some fun with it.
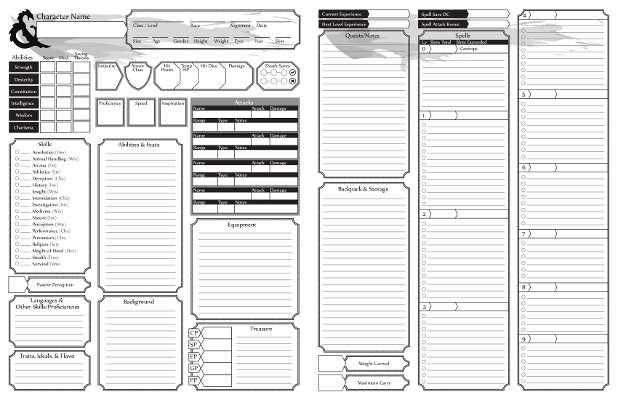
A Better Character Sheet
5/4/20
Surprise! As an artist and developer I have many nerdy hobbies. Playing Dungeons & Dragons has been on of them since the original Advanced D&D. A few months back I began playing 5th edition. While it gets many things better than 4th edition the one thing I wasn't a fan of was the official character sheet. So, I used my designer skills to make (what I think is) a better one.
My crew and I enjoy using it so I figured, why not share with the world? Anyways, if you'd like to try out my character sheet you can download it here!
Action JavaScript
11/2/19
Now that ECMA 6 JavaScript standards are widely supported on most browsers I wanted to start a project that would help me explore the intricacies of the new capabilities. Being an old ActionScript expert and fan of game development I thought developing an AS3 like set of libraries would be a fun an interesting project. Currently, for lack of a better name I'm calling it ActionJavaScript ... at least until I find a better title. The project is currently running under GNU GPLv3 so, ya know, do as you will with it.
I currently have a good enough foundation to create web games with relative ease. My test game for the project is Mad Monkey and the Thunderdome which I plan on building up along with the AJS libraries.
Here is a list of the current libraries available.
Currently manages basic events and object hitTests.
Stage - scripts/ui/stage.js
Just as in Flash the Stage object is the main container for all other UI element and is essentially a glorified MovieClip.
MovieClip - scripts/ui/movieClip.js
An object with a set of frames and frame rate that and play or be controlled via script. The use of "ENTER_FRAME" events allows for easy control.
Frame - scripts/ui/movieClip.js
The hold the different "frames" used in movie clips and can consist of a group of text or images.
BitMap - scripts/ui/bitMap.js
A standard pixel based image similar to a JS Image object.
TextField - scripts/ui/textField.js
Used for adding and controlling text object.
Button - scripts/ui/button.js
An interactive UI component for click events. Buttons currently have four states that can be styled [up, over, focus, active].
So far creating my little test game took less than a day and one I get this project moved forward a little more I would like to start making move browser based games using it. I think the time is long overdue for a Skate-er-Guy 2.
If all of this sounds like something you'd like to play with you can download AJS along with my test game HERE.
CSS/JS 3D Cube
9/2/16
Check out these examples.