Log
View Options
Mayhem in Miami
8/23/22
My friend and former neighbor Angelique was about to have a bachelorett party and asked me if I could design a logo for it. It had been some time since I've done a logo design so I was happy to give it a go. I dusted off my old light board and got to sketching out some ideas. After five roughs I finally got one she liked however, after rendering into SVG she had a few... a lot of change requests.
She's a bit of an art person herself so I invited her over to finish the design. The above image is my original design and below is the final. I think we made a great end result. If you'd like to see the design is it's full SVG glory, click here!
Dynamic SVG Filters
6/3/20
When redesigning my (this) site recently I wanted to do some fun things with dynamic display using SVG elements. If you have noticed the background is always different shapes and colors. This is because it is made up of randomly generated SVG elements. You may also notice that there is a shine to some of the edges. This is because of dynamically generated SVG filters applied to the shapes.
Here I'm going to share the techniques on making your own dynamic SVG filters. You will need some understanding of SVG filters to follow along. For this exercise we're going to create a light filter like the example below.
Light Filter Controls
Step 1: Element Setup
Let's set up our elements. First we'll add a placeholder element where we'll add our SVG content later.
[HTML]
				<div id="svg_wrap">
				 	<!--	Dynamic content	-->
				</div>
It's important to note SVG uses
DOM2
which means referencing them in JavaScript isn't exactly the same as referencing a HTMLElement.
To create an SVG element we'll want to specify the namespace where our element is defined. For all SVG elements you can use http://www.w3.org/2000/svg. To apply the namespace when creating elements we'll use createElementNS. Let's start and build all of the basic SVG elements.
- <svg> The main SVG element that will hold all other elements.
- <defs> Here we define filters that we can attach to our graphic elements. Child of svg.
- <filter> The filter combines all of the style layers that we will want to apply. Child of defs.
- <feSpecularLighting> A basic lighting layer that controls color and intensity. Child of filter.
- <fePointLight> A modifier for feSpecularLighting that controls size and placement. Child of feSpecularLighting.
- <feComposite> This allows us to add a filter to a graphic object. Child of filter.
- <circle> This is our graphic element. Child of svg.
Let's see what this looks like in script.
[JavaScript]
				var svg = document.createElementNS("http://www.w3.org/2000/svg", "svg");
				var defs = document.createElementNS("http://www.w3.org/2000/svg", "defs");
				var filter = document.createElementNS("http://www.w3.org/2000/svg", "filter");
				var fe_spec_light = document.createElementNS("http://www.w3.org/2000/svg", "feSpecularLighting");
				var fe_point_light = document.createElementNS("http://www.w3.org/2000/svg", "fePointLight");
				var fe_comp = document.createElementNS("http://www.w3.org/2000/svg", "feComposite");
				var circle = document.createElementNS("http://www.w3.org/2000/svg", "circle");
Cool, now we have all of the elements we'll be using to build our example.
Step 2: Attribute Setup
Next we'll set the attributes to our elements. Unlike the SVG elements, a namespace isn't required when manipulating element attributes. So, when calling setAttributeNS the first parameter will be null.
I have added comments to the code sample below to explain some of the more esoteric attributes.
[JavaScript]
				// Set attributes for the svg element
				svg.setAttributeNS(null, "viewBox", "0 0 100 100"); // The display area of our SVG canvas
				svg.setAttributeNS(null, "width", "100");	// The width of our SVG canvas
				svg.setAttributeNS(null, "height", "100"); // The height of our SVG canvas
				// Set attributes for the filter element
				filter.setAttributeNS(null, "id", "circle_fitler"); // For refercning when applying the filter to our circle element
				// Set attributes for the feSpecularLighting element
				fe_spec_light.setAttributeNS(null, "result", "spec_light"); // For refercning in feComposite in2 attribute
				fe_spec_light.setAttributeNS(null, "specularConstant", "2"); // The hardness of the light
				fe_spec_light.setAttributeNS(null, "specularExponent", "50"); // The spread of the light
				fe_spec_light.setAttributeNS(null, "lighting-color", "#fff"); // The color of the light
				// Set attributes for the fePointLight element
				fe_point_light.setAttributeNS(null, "x", "50"); // The X position of the light
				fe_point_light.setAttributeNS(null, "y", "20"); // The y position of the light
				fe_point_light.setAttributeNS(null, "z", "50"); // The z or distance of the light
				// Set attributes for the feComposite element
				fe_comp.setAttributeNS(null, "in", "SourceGraphic"); // The element to apply the filter to. SourceGraphic means the origin element
				fe_comp.setAttributeNS(null, "in2", "spec_light"); // The id of the filter to apply
				fe_comp.setAttributeNS(null, "operator", "arithmetic"); // This allows us to combine the outcomes of our two in targets
				fe_comp.setAttributeNS(null, "k1", "1"); // Light source inside of SourceGraphic
				fe_comp.setAttributeNS(null, "k2", "1"); // SourceGraphic opacity
				fe_comp.setAttributeNS(null, "k3", "0"); // Setting this to 0 prevents the transparent background from getting light
				fe_comp.setAttributeNS(null, "k4", "0"); // Setting this to 0 prevents the transparent foreground from getting light
				// Set attributes for the circle element
				circle.setAttributeNS(null, "cx", "50"); // Start X position
				circle.setAttributeNS(null, "cy", "50"); // Start Y position
				circle.setAttributeNS(null, "fill", "rgb(153, 153, 255)"); // Circle fil color
				circle.setAttributeNS(null, "r", "50"); // Circle radius
				circle.setAttributeNS(null, "style", "filter: url(#circle_fitler);"); // Point to our filter id to apply it
Step 3: Construct the Elements
Now we just need to put the elements together in the right order. Use the elements list above if you get confused on what element should be a child of another element.
[JavaScript]
				fe_spec_light.appendChild(fe_point_light);
				filter.appendChild(fe_spec_light);
				filter.appendChild(fe_comp);
				defs.appendChild(filter);
				svg.appendChild(defs);
				svg.appendChild(circle);
				// Target the element where we add all of the elemtns
				let svg_wrap = document.getElementById("svg_wrap"); // Use the id of the element you want to add everything to
				svg_wrap.appendChild(svg);
Now you should be able to run your code and see your circle with the pin light filter applied to and since we have JavaScript references to all of the elements we just built we can easily change their attributes.
Step 4: Applying Controls
Now, there are a whole bunch of ways we could manipulate our light. We could use a setTimeout to gradually move it. We could make it blink. We could make it pulse. For the purposes of this experiment we're going to use range sliders to adjust our light.
Here is the markup for the range sliders.
[HTML]
				<div>
				 	<input id="pinx" name="pinx" type="range" min="0" max="100" step="1" value="50"/>
				 	<label for="pinx">X</label>
				 	<br/>
				 	<input id="piny" name="piny" type="range" min="0" max="100" step="1" value="20"/>
				 	<label for="piny">Y</label>
				 	<br/>
				 	<input id="pinz" name="pinz" type="range" min="0" max="100" step="1" value="50"/>
				 	<label for="pinz">Radius</label>
				</div>
Note the id attribute of the inputs. We'll be using these.
[JavaScript]
				// Get referces to control inputs
				ctrl_pinx = document.getElementById("pinx");
				ctrl_piny = document.getElementById("piny");
				ctrl_pinz = document.getElementById("pinz");
				// Create contorl function
				function updateFitlers(e)
				{
				 		let fx = ctrl_pinx.value;
				 		let fy = ctrl_piny.value;
				 		let fz = ctrl_pinz.value;
				 		fe_point_light.setAttributeNS(null, "x", fx + "");
				 		fe_point_light.setAttributeNS(null, "y", fy + "");
				 		fe_point_light.setAttributeNS(null, "z", fz + "");
				};
				// Assign functionality
				ctrl_pinx.addEventListener("input", updateFitlers);
				ctrl_piny.addEventListener("input", updateFitlers);
				ctrl_pinz.addEventListener("input", updateFitlers);
Conclusion
Congratulations, if you've been following along you should have your own dynamic SVG filter working. If not you can download the example package and have some fun with it.
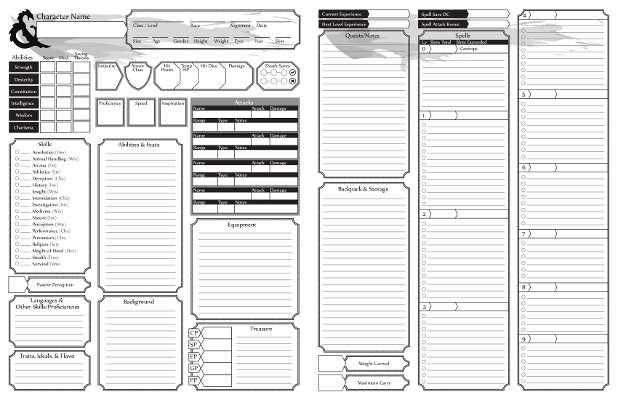
A Better Character Sheet
5/4/20
Surprise! As an artist and developer I have many nerdy hobbies. Playing Dungeons & Dragons has been on of them since the original Advanced D&D. A few months back I began playing 5th edition. While it gets many things better than 4th edition the one thing I wasn't a fan of was the official character sheet. So, I used my designer skills to make (what I think is) a better one.
My crew and I enjoy using it so I figured, why not share with the world? Anyways, if you'd like to try out my character sheet you can download it here!
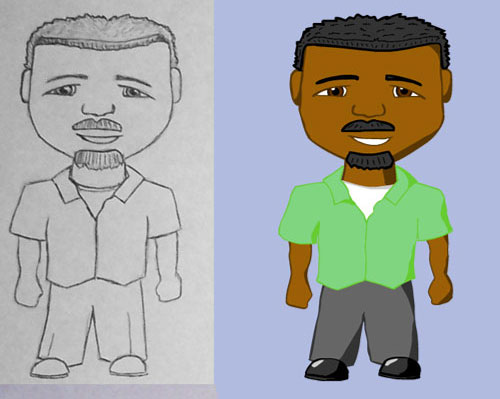
More Vector Cartoon People
4/2/12
So I have been doing a good bit more work in the area of design and animation lately, even picking up on 3D model building (soon to come). A while ago I had to draw up some vectorized cartoony people. Well the scope of that project changed and sadly they have been put aside and replaced by non-human avatars. Not all is lost though, for now I shall show them to you!


Basics of Graphic Optimization for Flash
11/21/11

One thing that I have found in my years of editing and fixing FLAs is that most people seem to take little regard to graphic optimization. Graphic optimization is important in order to make your application as efficient as possible. The Adobe Flash Player (AFP) handles both native vectors and bitmaps. Both of these have specific reasons to use one over the other. I will not get into the visual differences of vector graphics vs. bitmaps, I will explain when and why to use one or the other and how to do so at an optimum level.
To understand graphic optimization for flash you need first examine the AFP and how it handles the two major graphic types. Vector images are built and calculated continuously on stage with their properties applied to them by the AFP. Now the important thing to consider is vectors are little more than an array of points and some extra properties such as stroke, color, and so on. This most always will make for a drastically smaller outputted SWF file. However if your application requires a lot of stage movement, rotating, and tweening than you must also keep in mind that the AFP has to re-calculate all of these points, which can be quite CPU intensive. So vectors might not be the best approach to graphics for flash gaming, unless used for simple static graphics such as menus or buttons.
Bitmaps are the tried and true format for Internet images. They are handled in the AFP with about the same efficiency as any standard web browser. On average using bitmaps will bloat the size of your SWF file, making for longer loading time. The advantage however is that bitmaps are much easier for the AFP to move around on stage. Instead of recalculating numerous points the AFP simply needs to know what the new (x,y) registration point is. The bitmaps are cached so duplication and tweening are much less CPU intensive.
Now it is true that you can cache your vector images as bitmaps. However it is important to keep in mind that this command happens when the object is introduced to the stage. Clearly this makes the use of cached vectors (or vectors in general) a poor choice for things like gun firing in a game or scrolling background objects. To curb the stress on runtime processing you can store your vector in a movie clip and assign that movie clip to export on the first frame, however the caching command will still process when it is called in your script.
Since we know the key difference between the two major graphic types and when they are appropriate, lets look at some ways of optimizing both vectors and bitmaps. While testing for optimal graphic performance it is advised to keep open a system monitor to track CPU usage for spikes. Another important thing to do is enable flash to generate a size report on export. To generate a size report select File -> Publish Settings -> Flash -> Advanced, then click the box for generate size report. After doing this you will get a break down of all of the images that are loading into your application, as well as the frame by frame byte usage.
To make vectors more efficient you remove unnecessary points from the graphic. This will not only reduce your SWF file size but also reduce CPU usage from movement. The key is finding the balance between efficiency and beauty. If you are dealing with complex vectors, such as the ones made when you preform a trace bitmap command, you may want to use the Modify -> Shape -> Optimize tool. This allows you to reduce many of the unneeded points very quickly. Also when using shapes, keep them as simple as possible and convert them to either a graphic or movie clip that you will then use instances of time and time again. By doing this you can re-size, re-color, and re-style several different copies of the same instance.
There are a number of benefits to having your vector stored as a movie clip or graphic. Both allow you to change the color and styles of the graphic, however movie clip adds many nice features for only a small increase in byte size. Movie clips can have several handy filters applied to them. Take advantage of these filters, if you are skilled enough you can really drop your file size and avoid use of several bitmaps. If converted to a class object you can export them to load on the first frame, for preloading, and as mentioned before they can be cached as a bitmap to move more efficiently on stage. Keep in mind several filtered symbols moving on a stage will severely impact CPU usage. Since we are on symbol types, I should say a word about usage of the button type. Don't.
In ways of optimizing bitmaps there is not as many options, but let's go over them. In your library you can right click and open the Properties panel for any bitmap. Here you have a number of options, but the ones we care about are the smoothing and quality settings. Smoothing will slightly blur the bitmap hiding pixelation caused by lowering the quality to shave off precious KBs of space. I find with smoothing on you can use around 50% quality and have good results.
Naturally graphic optimization takes time, especially on large complex projects, however the end result is happier users. Not much, aside from unnecessary sound, annoys users more than long load times and lagging. By taking the time to properly optimize your flash projects you can often eliminate these annoyances. Also it much easier on your server and bandwidth to deliver smaller files.
Veterans for Ron Paul 2012
11/9/11
For veterans day I lent my skills to the Veterans for Ron Paul group and did some probono graphics for them. They needed vector logos for things such as t-shirts and stickers. After a couple drafts I was able to give them a design they were pleased with.
Front

Back

Here are some of the other draft image ideas that I had presented.


If you would like to use these images for your t-shirt, sticker, hoodies, etc, download the zipped package of all high resoulution images! If you want to use these images on your web site or publication please mention where they came from.
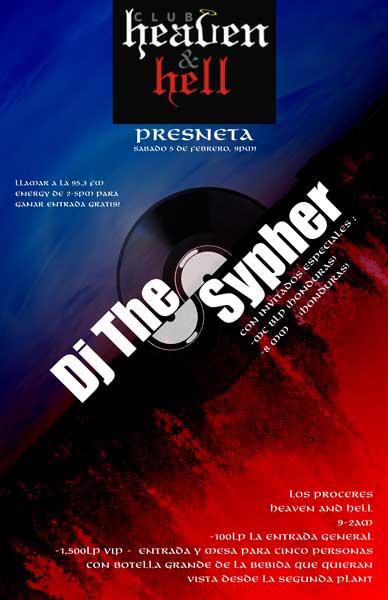
DJ The Sypher @ Heaven and Hell
2/5/11
I have recently completed a fresh new design for DJ The Sypher. As it seems with most design work it was a bit of a rush job. I was sent the info for the design the day before the show! Don't people know I have 10,000 other things I'm trying to get done every day? Anyways, within an hour or so I churned out this not amazing but rather nice poster for the event.
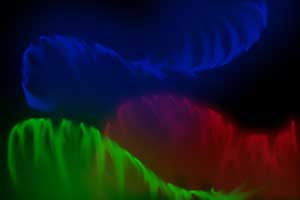
Free Wallpapers
8/25/09
So over this past year I have had a habbit of making desktop wall paper. Some of them are pretty cool and I thought to myself, why not share these with the folks who actaully visit my site. So here they are for you to download and use(click on the thumb nail then right click on the bigger image and save as). No water marks, restrictions, or any of that non-sense, enjoy!
UPDATE!
You can find all my wallpapers in my art section.
MurderOne Shirt App
5/20/09

So I have finally finished the shirt application for MurderOne Clothing! It turned out pretty well, all and all. There were several last minuet changes making it more interesting, and even though I had to take out some neat tweening effects the overall feel was still intact.
When setting up the pay-pal button, I developed an easy method of passing in multiple extra variables (other than price), using only one button. I will try to get a little example up about my method soon. I have been BUSY, lately look for a lot of updates when the storm calms!
AND!
Check out the T-Shirt App at: MurderOne Clothing
murderoneclothing.com is no longer active
Wallpaper tutorial
1/19/09
After making several different types of these wallpapers for friends and co-workers, I have decided to post a blog on how to make your own cool gas cloud type wallpaper. To do this you will need Photoshop or similar image manipulation software.
First, create a new file that is the same size as your desktop and set your background color, I always use black because it usually accents the vapor effect the best. Then select your brush tool and set the weight to some where between 3-5px. Make some colored line, note that you should put every line on it's own layer.

Next take your smudge tool and push the pixels in your line around. To get a good smear you should start pulling half-way through the line, to get an exaggerated pull that won't show up as much start at one side of the line and pull all the way through.

Finally when you have pulled your colored pixels around to your satisfaction, go to your Layer Properties panel and add a drop shadow. Set the Blend Mode to normal, and get your best sample of the color of the line, you can also use a similar color to get some other effects. Adjust your angle, then play around with your distance, size, and spread to get a good cloud floating off of your line.

You may want to tweak you lines after you have added your drop shadow cloud effect. I recommend save you image as a .jpg, this way you get a small file size and a good color transition. In the end this is how our example turned out.
If you want to download some neat wallpapers I have made visit my art section and feel free to download as much as you want ^_^!
Vigilant Logo
11/22/08
So, a little while ago there was talk about my companies appearance getting a face lift. Awesome! I was excited to get an opportunity to remake what I have always thought was a very unimpressive logo. Well it turned out that all this was just in speculation, but I want to share with you lovely folk the ideas I had for the new Vigilant Services logo.
![]()
Free Paul Jacob
11/12/08

Recently I have been doing some design and development work for the Free Paul Jacob campaign. My latest task was to re-design the Word Press based blog site. I enjoyed this project even though I was not entirely impressed with Word Press due to PHP restrictions. For more information about Mr. Jacob and why he has recently drawn fire from Oklahoma law makers visit the site . Or just visit the site to view my pretty design :)
freepauljacob.com is no longer active
Challenger Learning Center Site
...old

This was to be the main web site for Wheeling Jesuit's Challenger Learning Center. I was the sole programmer for the site, and had participated in creating the main layout and site infrastructure. I worked along with Cassandra Ligthfritz who focused soly on the design aspect. Together our creative minds made what I believe to be a very pretty site.
Update!
...The site is no longer on line, but I'm still hosting it from my site for all you beautiful people to take a look at.
CLC site